Showing posts with label Virtual-Reality. Show all posts

Thursday, October 9, 2014

Open DoVision User Manual - Chapter 3 Extension


3 Extension

The extensions are the functionality that do not come with the original Open DoVision, but can achieve by adding or changing some of the parts.
The extensions will show you the reason of the Open DoVision's existence.
Of course, if you get ideas, please tell me at kailanfu@gmail.com

3.1 Open DoVision CE

Open DoVision CinEma

3.1.1 Description

Make your Open DoVision a private cinema. Enjoy the huge screen occupying your whole view.
Also, use this extension can enable you to play all the games including the games that are not even ready for the virtual reality usage!
This is achieved by changing the T1 to the Tce procvided and the number of lenses used. The final effect is like placing a television in front of your eyes.

3.1.2 Instruction

Go to Thingiverse download all the files in the Open DoVision CE x.x and print it out. You'd better use 1.2mm shell thicknes instead of 100% infill, because the wall is only 2mm thin (0.4 nozzle) and 2mm layer height, for the quality of the model did not really affect the quality of the vision.
I uses about 4h to print out that, using 100mm/s printing speed250mm/s travel speed230C printing temperature. As I said before, all the plastic parts of Open DoVision ARE 3D print ready, so there is no need to use any support.
Replace the T1 with it. And add One 3x fresnel lens or One 3x convex lens using lens adopter for each eye.
Done!

3.1.3 Usage Hint

Note that we offer two different place for the elastic band over your head to thread. You can try them and decide which one to use.

3.2 Open DoVision PO

Open DoVision PhOne

3.2.1 Description

Enable the Open DoVision to take the advantage of your smartphone.
Just replace the SC with the POC we offer and place your phone in the middle.

3.2.2 Instrction

Go to Thingiverse download all the files in the Open DoVision PO x.x and print it out. You'd better use 1.2mm shell thicknes100% infill, and 2mm layer height because the wall is only 2mm thin (0.4 nozzle) and 2mm layer height and only the hardness of the model matters.
I uses about 1.5h to print out that, using 100mm/s printing speed250mm/s travel speed230C printing temperature. As I said before, all the plastic parts of Open DoVision ARE 3D print ready, so there is no need to use any support.
Open the virtual reality app on your smartphone, thread a right size of Non-slip mat into the POC, place your smartphone in the middle of the POC, fix your phone with three elastic bands, and replace the SC with it.
Done!

3.2.3 Usage Hint

You can combine the Open DoVision CE extension with this, watch movies in the cinema from your smartphone.

3.3 Open DoVision ON

Open DoVision OmNipotent

3.3.1 Description

Want to use your own electrics? Go!
Open frame for all cases possible.

3.3.2 Instruction

Go to Thingiverse download all the files in the Open DoVision ON x.x and print it out. You'd better use 1.2mm shell thicknes100% infill, and 2mm layer height because the wall is only 2mm thin (0.4 nozzle) and 2mm layer height and only the hardness of the model matters.
I uses about 1.3h to print out that, using 100mm/s printing speed250mm/s travel speed230C printing temperature. As I said before, all the plastic parts of Open DoVision ARE 3D print ready, so there is no need to use any support.
The first few layer is a little tricky to print, because there're many holes... But I'm imagining a better 3D printer can do better job.
Then you have to fix the elastic bands to the holes, I uses elastic bands of 1.5cm, 2.5cm, and 5cm diameter:

Then... fix the electrics you get to the elastic bands!


Enjoy!

Usage Hint

The four vertical elastic bands can holds the sensor board you use very tightly.

Open DoVision User Manual - Chapter 2 Usage


2 Usage

2.1 Bought from DotLab

How to use the Open DoVision if you brought it from DotLab somehow?

2.1.1 Prepare

Generally, if you brought the Open DoVision from the DotLab, you will get at least following parts:
  • LCD Display
  • LCD Controller Board
  • Sensor Board
  • Fresnel & Glass Lenses
  • Power Adopter
  • Cables
  • Elastic Bands
  • Plastic Parts
The electrics will be installed by us and you only have to add elastic bands and lenses to it.
  1. Find the plastic part looks like this:
It's called LE.
  1. Thread the elastic bands to the LE like this:
  2. Find the plastic part looks like this:
It's called T1.
  1. Thread the other ends of elastic bands to the T1 like this:

  2. Adjust the length of the elastic bands to get a comfortable feeling.

2.1.2 Check(Setup Cables)

To ensure that there are on problem with your Open DoVision, we suggest you follow the instructions below:
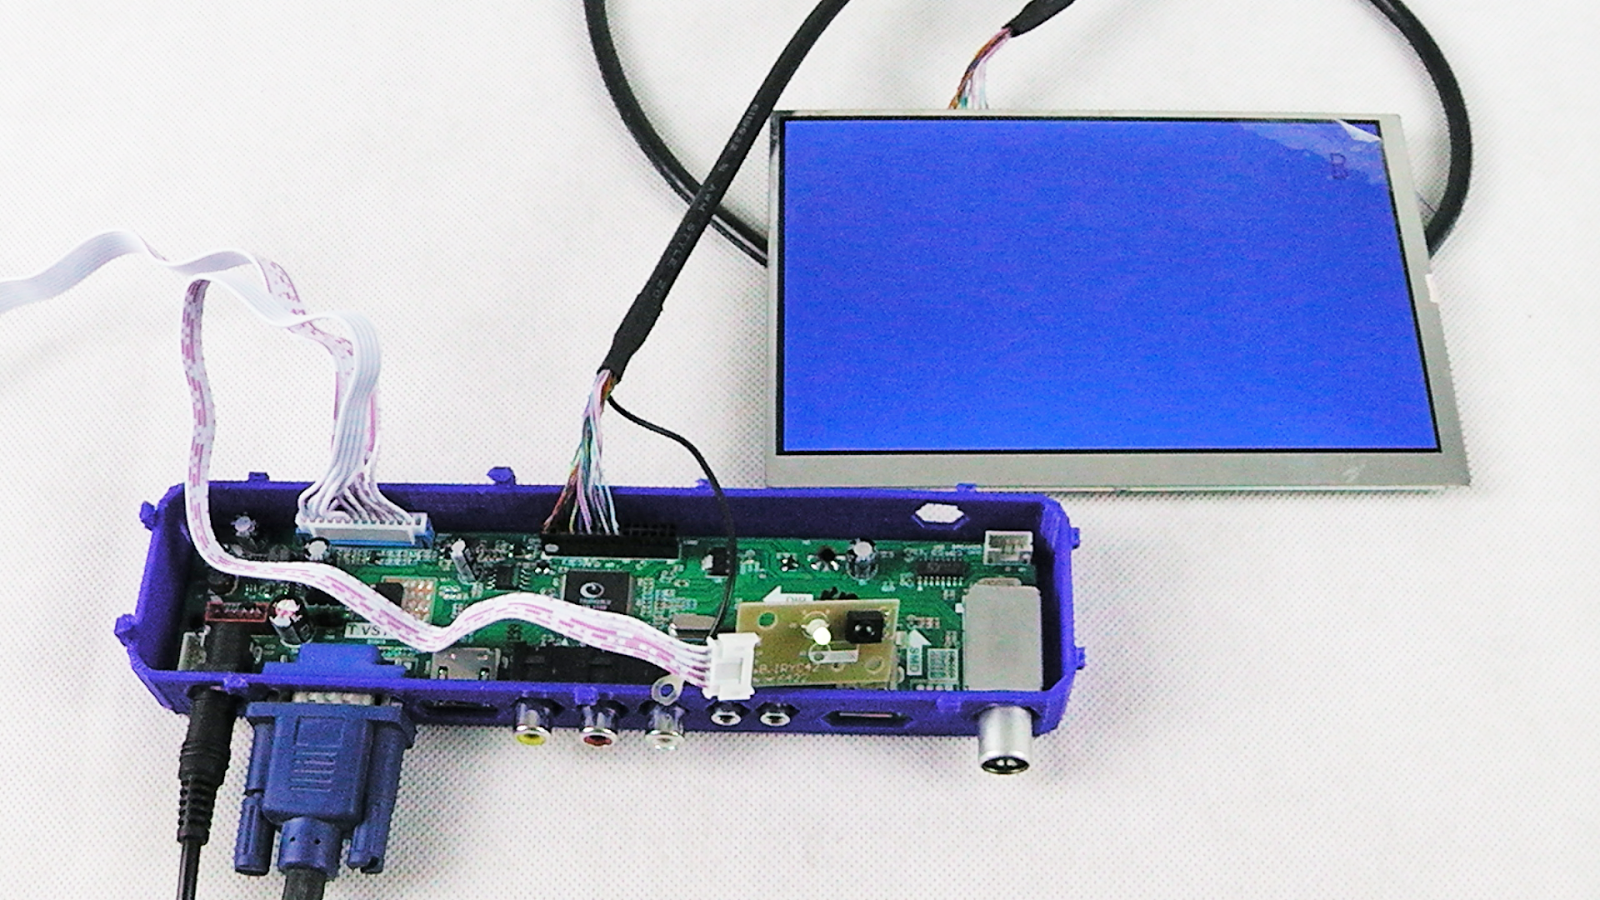
  1. Just plug in the Power Adopter. You should see the LCD display turns blue.
  2. Plug in the VGA/HDMI/AV Cable at your choice, and the LCD should turns to the image of your PC background image.
  3. Plug in the USB Cable. The mouse now should move with the movement of the Open DoVision.
If all above phenomena happen, your Open DoVision is ready!
If unfortunately something when wrong, please go to the Trouble Shouting section.

2.1.3 Lens

All kinds of lenses can be used to get Open DoVision working.
You will get two kinds of lenses:
  • Fresnel Lens
  • Glass Lens
the Glass Lens can be fixed to the Open DoVision using Lens Fixer


After you can apply multiple fresnel lenses to one eye.

Test them, and find the best arrangement for yourself!
The final assembling goes to the 2.2.4

2.1.4 Use

Just open a game that support side-by-side stereoscopic rendering, and put on the headset!

2.2 DIY

2.2.1 Prepare

If you want to make a Open DoVision yourself, you should go to following websites for more information about the specific parts you are making:
  • Thingiverse All the plastic parts
  • GitHub Firmwares for the sensor board
Go to the Open DoVision x.x in Thingiverse and download all the models and print it out use your 3D printer.
And buy some stuffs:
  • HJ070IA-02D LCD Screen Panel Display
  • PCB800182 Signal Converter
  • T.VST29 Controller Board
  • STM32F3DISCOVERY Sensor Board
  • mini-USB to USB Cable
I know that finding the right parts will probably be a nightmare, so we make a Extension that give you full ability to use the parts you want! Please scroll down to the Extension section for more information.
And check again:

2.2.2 Sensor Board

Now, to make the Sensor Board ready to use, please go to GitHub and download the .bin file in the usb-mouse folder, or other versions in other folders, and download STM32 ST-LINK Utility from ST.
...Or you can use the source files on the GitHub to make the project and get the binary file yourself.
  1. Open the STM32 ST-LINK Utility
  2. Load the binary file
  3. Plug the USB cable to the STM32F3DISCOVERY's debug port and your PC
  4. Connect to the target and Program Verify
  5. Disconnect from the target and unplug the USB cable from the debug port.
To test it, just plug the USB cable to the user port of the STM32F3DISCOVERY and move it to see if the mouse is moving as STM32F3DISCOVERY moves. If it is, the sensor board is ready.

And, in order to conserve more room, it is recommended to cut of long pins:

2.2.3 Electronics

Plug the cable like this:
Plug in the Power Adopter to see if the screen goes blue, if not there must be something wrong.
Connect the cables like this:
Plug in the VGA/HDMI/AV Cable at your choice, and the LCD should turns to the image of your PC background image.
Plug in the USB Cable. The mouse now should move with the movement of the Open DoVision.
All done! Your DIY Open DoVision is ready to use!

Note that when installing the screen, I recommend you to follow steps below:

2.2.4 Case

Slide in the T1 to the SC.
Stack the T2 onto T1.

Fabricate the elastic bands to the LF and T1 as told in the 2.1.1
Done!

2.3 Super DIY

If you can edit 3D model, you can try for Super DIY, which DIY the case according to the needs.
Go to Thingivers find Open DoVision OR x.x, get models, and then you can adjust the position of each part as you need,
or change the height of some parts to fit in with your parts.
And then, you can have your own parts printed.

Open DoVision User Manual - Chapter 1 Introduction


1 Introduction

1.1 General Description

The Open DoVision is a cross-platform open-source virtual reality project that designed to be easy to learn, use, and develope.
As a project, the hardware include cheap electronics and 3D-print-ready plastic cases.
The software include many embedded C projects for the sensor board of the Open DoVision, the demo PC applications, and various SDKs.
The Open DoVision project is in following website:
  • Thingiverse 3D-print-ready plastic cases A
  • Githab Source code development A
  • Sourceforge All data available N/A
  • Youtube Video explanation N/A
  • Blogger Manual and Update A
  • Kickstarter Funding for electronics A
The Open DoVision is and will still be a open-source project that carried on by DotLab.
All the files written by DotLab are published under GUN GPL V3.0 License.
All the files not written by DotLab have their own licenses, please read them before using them, please.
Enjoy!

1.2 Hardware

1.2.1 Display

The display of the Open DoVision include a LCD/LED display and a LCD/LED controller board.
The original display include a HJ070IA-02D LCD display with 60Hz refreshing rate and 1280x800 resolution and a VST29 controller board.
This arrangement balances the cost and the performance of the Open DoVision.
Feel free to change the display.

1.2.2 Sensor Board

The sensor board enable you to easily debug the embedded programs on it and do other interesting things.
The sensor board of the Open DoVision is designed by and produced by the DotLab, using following key components:
  • STM32F103C8T6 ARM-based 32-bit MCU
  • STM32F303CVT6 ARM-based Cortex-M4 32b MCU+FPU
  • LSM303DLHCTR Ultra compact high performance e-compass 3D accelerometer and 3D magnetometer module
  • L3GD20TR MEMS motion sensor three-axis digital output gyroscope
Since the STM32F3DISCOVERY has the same parts, we make the sensor board compatible with the STM32F3DISCOVERY SDK written by ST.
DotLab uses the ST's SDK under the license that ST offered.

1.2.3 Plastic Case

The cases of the Open DoVision has their own name:

1.3 Software

1.3.1 Embedded C

The embedded C projects of the Open DoVision uses the SDK for STM32F3DISCOVARY written by ST implement the sensor board to perform various tasks.
The folder sen stands for sensor board, contains all the files of the embedded C projects.
Every embedded C projects have following archive:
  • lib SDK for STM32F3DISCOVARY written by ST
  • inc Headers and variable manipulation
  • src Source files
Each file has its own description for its functionality.

1.3.2 Application

The PC applications show you how to implement the sensor board in the PC side after one specific embedded C project is chosen.
The folder app stands for spplication, contains all the files of the PC application.

1.3.3 SDK

The SDK is optional. For most of the embedded C project there is no need for farther implementation in the computer.
The sdk contains all the files of the SDK files.

Thursday, August 7, 2014

This is DotLab


We truly believe that everyone can do what he/she wants to do as long as we insist on the destinies we have set for ourselves.

We believe that the virtual reality is made for everyone to take his/her parts in it. And we dedicate our lives to deliver what we think is genuine to you.

DotLab